色んなものを入れたのでここで一端まとめ
色んなものを入れてしまって、自分でもよく分からなくなってきたので一旦絵にしてみる。
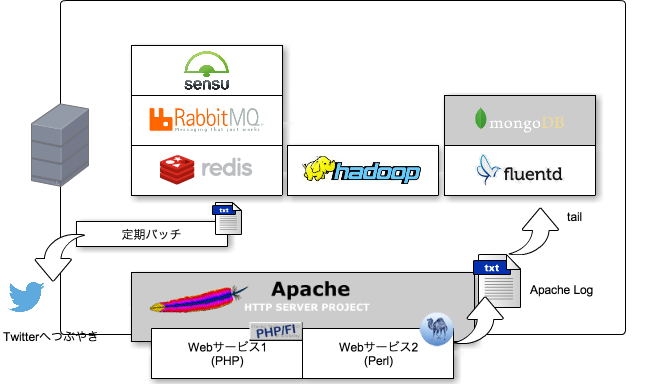
各部品を早く連携せねば。。。
さくらVPSにfluentd+MongoDBをインストールする
アクセス解析しやすい様にfluentdとMongoDBをセットアップ
/etc/yum.repos.d/treasuredata.repo
[treasuredata]
name=TreasureData
baseurl=http://packages.treasure-data.com/redhat/$basearch
gpgcheck=0
fluentd(td-agent)のインストール
yum --enablerepo=treasuredata install td-agent
/etc/yum.repos.d/10gen.repo
[10gen]
name=10gen Repository
baseurl=http://downloads-distro.mongodb.org/repo/redhat/os/x86_64
gpgcheck=0
enabled=1
MongoDBのインストール
yum --enablerepo=10gen install mongo-10gen.x86_64 mongo-10gen-server.x86_64
chkconfig mongod on
MongoDB用プラグインのインストール
/usr/lib64/fluent/ruby/bin/fluent-gem install fluent-plugin-mongo
/etc/td-agent/td-agent.conf
type tail
format apache
path /var/log/httpd/****-access_log
tag so.access
type mongodatabase so
collection accesshost localhost
port 27017flush_interval 10s
/var/log/httpdのディレクトリをfluentdでもアクセス出来る様に設定
service td-agent start
Webサービスにアクセス後、MongoDBの中身を確認
mongo
MongoDB shell version: 2.4.8
connecting to: test
> show dbs
local 0.078125GB
so 0.203125GB
> use so
switched to db so
> db.access.find();
{ "_id" : ObjectId("***"), "host" : "110.66.230.225", "user" : "-", "method" : "GET", "path" : "/so_index.cgi", "code" : "200", "size" : "4318", "time" : ISODate("2014-04-02T07:31:50Z") }
データも入っている事を確認
さくらVPSにsensuを構築する
下のリンクを参考に構築
Amazon Linux 上に sensu-server を構築する(1)
http://inokara.hateblo.jp/entry/2014/03/03/013147
■ gperftools-libs
TCMalloc が足りてないのでインストール
■ インストール
- RabbitMQ
- redis
- sensu
- SSL 証明書の生成
■ 設定
- [rabbitmq] vhost を作成
- [rabbitmq] vhost の権限を設定
- [rabbitmq] rabbitmq_management を有効にする
- [rebbitmq] rebbitmq.config の設定
- [rabbitmq] SSL 証明書を設置
- [rabbitmq] rabbitmq-server の再起動
■ config.json
6c6< "password": "mypass",
- -
> "password": "sensu",
20c20< "password": "mypass"
- -
> "password": "secret"
特に問題なく動いている模様。conf.dに設定ファイルを置いていないけどいいのかしら。。。
明日以降に設定を弄っていこう。